Import Facebook Ads Data
Deprecation
From December 2021, we are no longer supporting the new version of importing data from Facebook Ads. Please check out the announcement and suggested solution here.
Here is a quick 3-step process for querying Facebook Ads data in Holistics. Facebook Ads reporting in Holistics requires you to connect your Facebook Ads database

1. Set up a data source to allow data import#
Set up your database to allow write access for a given data source. Please have a look at our docs on how to connect your database to Holistics.
2. Connect your facebook ads database#
Go to New data source page -> Select Facebook Ads for Database Type.
You will see the below:

So what you need for the connection are Access Token and Ad Account ID.
3. Get your Ad Account ID#
Please login to the facebook account that manages the data you want to explore.
Then go to your Ad Account Setup
You will find your Ad Account ID as in the image:

4. Setup your facebook app#
Create a new facebook app if you haven't got one: please refer this guide on how to do it.
Holistics is using API v5.0. Please set permitted API version to v5.0 in Settings -> Advanced:

5. Add Marketing API to your app#
In your app dashboard, add a new product called Marketing API:

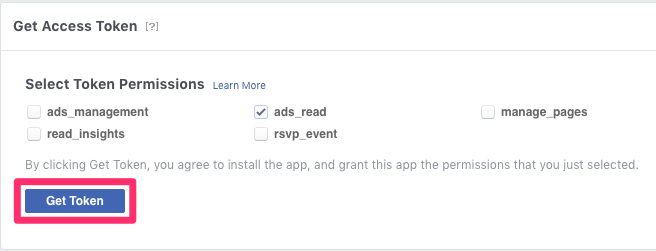
Now go to tab Tools under Marketing API. In section Get Access Token, check ads_read, then click Get Token

You will see your generated token. Copy and paste it to field Access Token in your new data source form.
Now that you can click Test Connection and connect to your facebook ads data!
6. Create a new data import#
To explore the data, you need to import them into a database that you can perform direct query.
Go to Data Import listing -> New single import

Select Facebook Ads as the source type and choose your recently connected data source:

You can now see the preview of your data. We currently support 3 tables: campaign, adset and ad.
7. Select/Create Destination Table#
Specify the destination data source, schema name and table name that you would like to import the data into.

8. Validate input and destination table structure#
Follow the steps below:

1) Choose import mode for this import.
2) Setup destination columns' name and type
3) You can add a new schedule for current data import. Optionally, data import can be executed manually after created.
4) Once you Validated Sync Config, you can submit by clicking Save or Save and Execute to run the data import now.
9. View, edit and execute your data import#
Once a data import has been executed, either manually or based on its schedule, a new job corresponding to the import job will be created to track its progress.
You can see the job's status by clicking value in column Last Run

Additional data#
Here are details of our supported tables.
Campaign#
| COLUMN | TYPE |
|---|---|
| id | Numeric string |
| name | varchar |
| objective | varchar |
| account_id | Numeric string |
| buying_type | varchar |
| spend_cap | int |
| status | varchar |
| start_time | date |
| stop_time | date |
| update_time | date |
Adset#
| COLUMN | TYPE |
|---|---|
| id | Numeric string |
| name | varchar |
| adlabels | varchar |
| account_id | Numeric string |
| billing_event | varchar |
| daily_budget | int |
| budget_remaining | int |
| optimization_goal | varchar |
| campaign_id | numeric string |
| created_time | date |
| start_time | date |
| end_time | date |
Ad#
| COLUMN | TYPE |
|---|---|
| id | numeric string |
| name | varchar |
| adset_id | numeric string |
| account_id | numeric string |
| campaign_id | numeric string |
| adlabels | varchar |
| bid_type | varchar |
| bid_info | varchar |
| created_time | date |
| effective_status | varchar |